Pages
Monday, October 24, 2011
Friday, October 21, 2011
Aquatic Apes on Facebook
We have a Facebook group. Come join us for posts only seen on the page and share your stoke!
Aquatic Apes Facebook group.
That curling wave above was shot at Rockaway.
Aquatic Apes Facebook group.
That curling wave above was shot at Rockaway.
Wednesday, October 19, 2011
Stick to it
Oliver Parker on a Ryan Lovelace 8' v.Bowls
This video has been making the rounds. Wanted to share it here just incase you have not seen it. It's an incredible ride. The commitment and skill is amazing.
Originally posted on Ryan's blog PC Progress
This video has been making the rounds. Wanted to share it here just incase you have not seen it. It's an incredible ride. The commitment and skill is amazing.
Originally posted on Ryan's blog PC Progress
Thursday, October 13, 2011
Project Model Surfboard
Aside from today it's been flat around here. In order to keep the stoke fires burning I started to make a model surfboard out of blue foam. I started by cutting down a block of foam I had hanging around the studio. I then looked for templates to print out and follow.
Once I found my shape I cut it out and drew it on the foam. From there I delicately cut out the silhouette of the shape from the foam.
After sanding the outline down and smoothing out the bumps I was left with a big chunk of foam. Then it dawned on me that I now needed to learn about rocker and foam distribution. Needless to say I had a lot of sanding in front of me.
In order to create a rocker template I printed out a fish profile that I found online. I continued to draw my guide lines then proceeded to sand out my rocker profile.
Then came the rails and this was by far the hardest part. I really had to use my gut to figure it out. I let my hands feel the way and used my eyes to double check the lines and curves.
Sand, sand then sand some more. I finally shaped the rails to the best of my ability. Next up is glassing! Well in my case I used acrylic polymer to seal the foam then sanded more to smooth it out. Then applied more medium then sanded and so on.
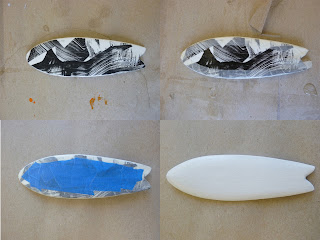
Now that it's getting smoother I painted it white so that I could get creative. I applied several coats then sanded and painted again and well you get the picture.
Up next is the art. I took some imagery from my own work and applied it to the bottom of the board. I wanted to do some crazy paint work on the top so I masked of the bottom then sealed it with medium to ensure clean lines. That's a little trick I picked up years ago from another painter.
Now we paint! I just went over to my paint table and grabbed some colors that were already mixed and thinned out. The gray/green and red look great together but the purply pink pops the whole board.
Clean lines. The mask worked and I love the contrast between the top and bottom.
Okay now the fins. After some reasurch I settled on these twin keels by Gephart. I used an old milk carton as the material. I read somewhere that the fins should point to the stringer at the nose of the board. I don't know if this is true but I did want toed fins so I set some guide lines and glued them in place.
Once the fins were on, I covered the board a few more times with medium, effectively giving it a hot coat. The finished board!
This project was a lot of fun. I learned so much about shaping and how hard it really is. I already had a lot of respect for shapers who shape by hand. Needless to say I now have so much more. I am really interested in shaping and would like to learn more.
Tuesday, October 11, 2011
Friday, October 7, 2011
A postcard from Wednesday
We hit the water with a gusto and for a brief moment it was good. The ocean had different plans and the swell dropped. Some people got out. Others, mostly newbies got in with hulking longboards. With time to spare Freaky Born and I grabbed the fins and hand plane and I took turns poaching a few from the falling longboarders.
Monday, October 3, 2011
Subscribe to:
Comments (Atom)


